
Monday, July 19, 2010
Done and Done
Finished bright and early this morning. Had a plan to break things down so that I wouldn't find myself staying up late into the night the weekend before and wouldn't you know that that's whay I did. One of my favorite movies on repeat and a call in sick to work. Nothing quite like the satisfaction that came upon finishing that very last book. I probably should've done it finishing one book first and then the others but I found it a a better process getting it all done together. Working out the kinks as I went along. It helped alot with the cutting and measuring and dear lord the glue. I swear I'm OCD with all the handwashing I did only have to go back and get them messy again. Tried to keep a wet cloth handy but that only worked for so long. It was messy and tiring but oddly satisfying. Have ideas for a few other projects that I'd like to put together...without the pressure of an extremely looming deadline. I definitely agree with the therapeautic nature of putting everything together. Really happy with what came out...from story to the end product.
Before:


After:


Before:


After:


And...you're finished!
Congrats, folks, on a job well done!
I'll be picking up the books tomorrow and grading in the next couple of days. I believe the grades have to be in by COB 7/22, so you won't have long to wait.
Talk to you soon. :)
Jenny
I'll be picking up the books tomorrow and grading in the next couple of days. I believe the grades have to be in by COB 7/22, so you won't have long to wait.
Talk to you soon. :)
Jenny
And...Done!
So here are all my finished books. I am not sure why I waited until this weekend to get everything done, but after a lot of cutting, and mod podgecoated fingers, I made it! I'm really happy with my finished product although I am about to revise the piece of writing I used (I will not let that drive me nuts, though). I have learned that printing with crop marks is the way to go -- helps to get those really straight cuts. Also, printing front to back AND getting everything aligned is REALLY hard even when you have printed test after test. I also continue to love Paper Source and wish there was one closer. Here are some pictures of my little army of books:

Here is one open.

The back cover!

The front cover.

All the pretty ribbon!
Here is one open.
The back cover!
The front cover.
I think that the best way to go about making a series of books is to make one copy first. That way you can work out all the kinks and make sure that the ideas you have are possible! I really enjoyed my summer of making books!
hard hat required
coming around the construction bend held a number of fun surprises, but not as many as i might have thought thanks to (you guessed it) mock ups!
.jpg)
.jpg)
Exhibit A. $75 worth of paper folded and ready to be glued. Thanks, Staples, for warning me that this tiny 10 book project would cost me dinner for a week. I'm not sure who wouldn't be surprised by that pricetag, but... um... I was.
At any rate - they're beautiful! And colorful! And laid-out correctly!
Exhibit B. Since my accordion book is two-sided, I had to glue the backs together before folding. Two of the pockets (you can sort of see them... under the pink square there's a light blue box that doesn't match anything else) will be glued under the covers. This view shows the back pockets before they're folded under the book... if that makes any sense.
Spoiler alert: I ended up just gluing the sides down rather than stitching them. I thought the stitching would compete with the bold white box ... and ... I didn't leave a larger margin on the outer edges, as I should have if I'd really wanted to do it. Also I thought the glossy high-impact printing would actually confuse the stitching idea. I didn't complain that it was faster this way too :)
worth a thousand letters
design is about decisions... so here's a run-down of a few end-of-the-game decisions that had to be made. my original vision was to use craft foam as letter cut-outs, however I realized that it would make the book too thick once the letters were inserted into the pockets.
therefore, i tried craft paper:
.jpg)
and decided that i really had to use something i could feed in the printer, otherwise i would have to cut each piece out only after tracing it with a stencil, which itself had to be cut out. these shapes didn't lend themselves well to so much tracing and cutting in the first place, and my patience definitely didn't lend well to such an inefficient method. enter cardstock that's color-coordinated with my pockets -- adding the extra benefit of indicating which face is which (mostly):
.jpg)
as you can see, the skinny little strokes don't look like they can hold up to playtime, as they're intended. enter contact paper (mostly):

.... stay tuned for an exciting construction post and the big reveal!
book fun


So here are my ten books. They are sprawly if I open them all, so I have made two pictures, one of which is them looking all tall and organized with a couple of sprawly ones, and one which shows them stacking nicely, as if they play well with others (they don't).
As to what I learned... I learned a lot of things. I think one of the most important was that I can keep changing things for a while until it all actually (more or less works). The MOST important, though, is that if you have enough Mod Podge caked onto your hands, and the dog barks right next to your head while you're trying to use an Xacto knife, the Mod Podge will absorb most of the cut action of the blade as it sinks into your finger. Yay for Mod Podge!
Fin
I can't believe I used all the glue.
That was the phrase of the day, yesterday. Of course I had Mod Podge, but I'd planned to use what was left of that to lacquer everything up shiny-like.
That was a minor speed bump in the big picture. Everything had been going nicely and in a timely manner, which I should have known was too good to last because I'm never done anything anymore with time to spare. I'd save the weekend as a production push, no plans except putting all the pieces together. I'd gotten all my parts ready and lightly tested some bits & pieces for fitting and glue compatibility, but I had not completed a book in its entirety. Doing this on Saturday and Sunday would not have been a problem at all, except I spent Saturday pacing around in a tizzy over the dog and his mysterious illness then at the animal hospital (I think everything is going to be fine, if you might be concerned.) So that left me Sunday, which was still devoted in large part to the dog. I got it all done, just not through the calm-&-steady zone but rather the adrenaline filled running-outta-time-zone.
Anyway, I am happier with my concept and ideas for the story more so than I am with the actual products. Not that I'm unhappy with those, I just feel that, as with most things, if I'd taken more time earlier the results would have that little extra bit of finesse. Mine wasn't a precision project, but things could definitely be a bit straighter/centered/neater in general, and probably would have been if I wasn't so strung out when I assembled them. And I discovered at midnight that I'd only prepared 8 text blocks instead of 10 (I could have sworn there were 10, it's possible I lost a couple in the chaos of my workspace.)
Again, it's not that I'm unsatisfied, just not as satisfied as I think I could have been.
If anyone should read the story (Jenny), I want to be the first to point out that, despite spending more time than I meant to on the actual text, there are several typos. (Note to self-- InDesign does not do spell check.) The first I noticed was "deam." And yes, it's on all 10 copies. *cringe*
I could talk about all the things that didn't go so well forever, because those are the things I've agonized over. Stuff went well, too. But now I'm out of blog fuel (and I'm at work.) So here's pics:
Scroll images

Broke two needles

This looks sloppier than it is, mostly
 At work, thinking I might get to take more pictures.
*I forgot to add, this has been fun, our class time and period of free-work. It's easy to gripe about stuff, and I never mean to spend so much time doing that in papers or blogs. The book making process, I've found, is therapeutic, and even when things don't turn out exactly as planned or as pretty as anticipated, I usually still feel good about it, and the times I really don't are the times when I start over. :-)
That was the phrase of the day, yesterday. Of course I had Mod Podge, but I'd planned to use what was left of that to lacquer everything up shiny-like.
That was a minor speed bump in the big picture. Everything had been going nicely and in a timely manner, which I should have known was too good to last because I'm never done anything anymore with time to spare. I'd save the weekend as a production push, no plans except putting all the pieces together. I'd gotten all my parts ready and lightly tested some bits & pieces for fitting and glue compatibility, but I had not completed a book in its entirety. Doing this on Saturday and Sunday would not have been a problem at all, except I spent Saturday pacing around in a tizzy over the dog and his mysterious illness then at the animal hospital (I think everything is going to be fine, if you might be concerned.) So that left me Sunday, which was still devoted in large part to the dog. I got it all done, just not through the calm-&-steady zone but rather the adrenaline filled running-outta-time-zone.
Anyway, I am happier with my concept and ideas for the story more so than I am with the actual products. Not that I'm unhappy with those, I just feel that, as with most things, if I'd taken more time earlier the results would have that little extra bit of finesse. Mine wasn't a precision project, but things could definitely be a bit straighter/centered/neater in general, and probably would have been if I wasn't so strung out when I assembled them. And I discovered at midnight that I'd only prepared 8 text blocks instead of 10 (I could have sworn there were 10, it's possible I lost a couple in the chaos of my workspace.)
Again, it's not that I'm unsatisfied, just not as satisfied as I think I could have been.
If anyone should read the story (Jenny), I want to be the first to point out that, despite spending more time than I meant to on the actual text, there are several typos. (Note to self-- InDesign does not do spell check.) The first I noticed was "deam." And yes, it's on all 10 copies. *cringe*
I could talk about all the things that didn't go so well forever, because those are the things I've agonized over. Stuff went well, too. But now I'm out of blog fuel (and I'm at work.) So here's pics:
Scroll images

Broke two needles


This looks sloppier than it is, mostly

 At work, thinking I might get to take more pictures.
*I forgot to add, this has been fun, our class time and period of free-work. It's easy to gripe about stuff, and I never mean to spend so much time doing that in papers or blogs. The book making process, I've found, is therapeutic, and even when things don't turn out exactly as planned or as pretty as anticipated, I usually still feel good about it, and the times I really don't are the times when I start over. :-)
Friday, July 16, 2010
Take 2!!
Let's see if they'll post here. This is the book that I am NOT making...the one I mentioned in one of my earlier posts. This was the plan but again gotta work with what I have.


you say it's what day?
f.u.n.
I wish I had a more exciting update prepared for you - it's coming! - but since I don't want you to forget about me over here, I'll just say this: I've had to learn the hard way that having access to some of the fonts you need on one computer, and other fonts you need on another computer, particularly when one computer is a pc at your office and the other is a mac at your home, can really cost you a lot of time. I can't even admit how many times I tried to finish this thing up only to remember that the reason I hadn't already finished it is because I needed to use that typeface and the reason I couldn't use that typeface is because it's on that other computer. Thankfully, there are wills and ways and even fonts can stand in the way of books. More good news: had my last Book Design class of the summer tonight and -- although it won't help me wrap up two more classes between now and Monday -- I'll have my Tuesday and Thursday nights back :)
Thursday, July 15, 2010
My Little Printer that Could
...until it couldn't. I don't even want to think about the poor trees that I slaughtered at work and home. Had a plan and when that didn't work out...came up with four others that met the same fate. I don't even want to discuss the torture device that is InDesign. I had a plan and a timetable. You know the saying...We Plan and the Big Guy...well, you know. I actually ran through an entire cartridge of color ink and one of my favorite of the pictures wants to come out all....adskjfasdjf. I could let it go and use the ones I already printed in black and white but the color just makes it pop and means so much more to the actual story and project as a whole. I ordered new ink but will it get here in time. HAAAA. (Don't mind me...I'm hysterical or sleepy oooor both). Either way, I'm ready to move forward if need be with what I have. Just need to draw a few straight lines and not slice up anymore fingers.

See? Piles and Piles and Piles of paper.

See? Piles and Piles and Piles of paper.
Voila! a prototype!
Ladies and gentlemen!
I give you:
A BOOK!
.JPG)
This is the title page...

Of course, it is what we in the writing & publishing biz call a ROUGH DRAFT. By which I mean ROUGH, by golly.
This is what my little accordion friend looks like spread out. And please ignore the CHAOS of my "desk," which is actually my "dining table," until my office upstairs is fixed again (long story).
.JPG)
But I think I finally figured out solutions to the 97 things that were continuing to NOT WORK.
Now I just have to make a ton more. Which is fine.
Wednesday, July 14, 2010
Extra Credit and Assembly
Just an update on my progress. I have everything cut, sorted and ready to be assembled into my 9 other books:
 I plan on putting them all together this weekend. I have been working on my extra credit assignment (because I missed a class -- so don't panic). I decided to use a line of poetry from Joy Harjo's poem "Summer Night" because it was vivid and beautiful. I was origionally going to illustrate it in InDesign, but after I opened my box-o-crafts, I realized that I had some great paper, etc. that would be better to work with and require less computer time. I am really happy with how it turned out.

And one of the pages close-up.

I plan on putting them all together this weekend. I have been working on my extra credit assignment (because I missed a class -- so don't panic). I decided to use a line of poetry from Joy Harjo's poem "Summer Night" because it was vivid and beautiful. I was origionally going to illustrate it in InDesign, but after I opened my box-o-crafts, I realized that I had some great paper, etc. that would be better to work with and require less computer time. I am really happy with how it turned out.Here is the cover:

All of the pages fanned out:
And one of the pages close-up.
I like how the book unfolds and closes because it is similar to the way Harjo describes night in summer. Hope you are having a great week!
Saturday, July 10, 2010
progress
Tried out a few different things while waiting for more supplies I ordered. Those old notebooks certainly came in handy because I really wanted to try working on a couple of concepts I had in mind for my collection of stories bound in hardback. Also I found more great fabric that I wanted to use for my books. First though had to test it out and make certain that it didn't look completely ridiculous and that the glue didn't seep through. Finished up a text block and measured out the board for it. It didn't turn out very badly though there are spots where I wasn't careful with the glue. Not necessarily it seeping through the fabric but fingerprints. Also, I had a few issues with the inside. The paper I was using was a little on the thick side and then the first and last pages of the text block were sticking to it. Finally ended up gluing those pages over the too thick paper I'd used and I actually like the effect of it all. Still the entire point of the exercise was to see if the fabric would be sufficent for binding up my final set and I'm pretty happy with it. As long as I can keep my glue covered fingers to myself.
ETA:
This was fun and as it turns out not what my final books will look like. Bookmaking is like improv comedy...you gotta go off the cuff and work with what you have ;).
Trying to add the pics but...
ETA:
This was fun and as it turns out not what my final books will look like. Bookmaking is like improv comedy...you gotta go off the cuff and work with what you have ;).
Trying to add the pics but...
Just checking in...
Hi folks!
Hope you're all well. I'm enjoying seeing the pics and reading about your progress. It sounds like great things are afoot...
As you're finishing things up, please know that you can feel free to e-mail me anytime for ideas/brainstorming/etc. I check my yahoo address most often...
One other thing: I'm going to check in with Kendra to see if we might have a table at one of the readings in the fall semester. I'm assuming you'd like to display and/or try to sell your books...right? I hope so...they're looking great so far!
Will let you know what I find out...until then, stay cool!
JennyO
Oh, InDesign! I forgot you were there.
I don't know why I default back to using Word for anything that involves, er, words. And even many other projects that don't so much. I used InDesign to make one of the books in my pair a few weeks ago, and that was because I heard, "...lay it out in InDesign..." while we were learning to make the magic book, and I held on to that phrase, like it was an idea I wouldn't have thought of on my own.
Well it turns out that yet again I didn't think of using the program I paid beaucoup bucks for and which is specifically designed for the sort of projects I continue to try to pull off in Word. So, thank you Christine for your blog post! It reminded me that InDesign exists, and I own it and will use it, even if only its most basic functions and it will still be better than Word. Whew. Thanks also go to Rafe, for reminding me today that we need to use words AND at least one image! I hadn't gotten that far and might have been unpleasantly surprised to go back over the requirements and realize I'd formatted my pages and created covers without one. I could see that happening.
So this is where I am currently, formatting, laying out my story on pages. I had an "Ah hah!" moment just this morning which made me change my mind for the content, as I came across a story I wrote a while ago and think is much more fitted for this assignment. Yay. :-) I have a lot of work to do this week. Work-work (job) has been increasingly hairy (my supervisor of 5 years was fired last week and then I almost quit) so I haven't dedicated much quality time to my book making. But now, the clock is a-ticking!
Friday, July 9, 2010
a question, I guess
Hello everyone. Don't know if anyone else is checking this (I am all the time, but that's because I am not doing things like going to work, which I think almost all the rest of you are). If anyone is, I have a question. My book is a poem. Well, it's an accordion book OF a poem. The poem is sortof about unicorns (but not exactly). So I put in a unicorn picture. The problem is that I don't want to make the picture small enough to fit right on the page, so I thought maybe I should break it up in pieces like a puzzle. I'm not sure yet how I feel about it - any thoughts?
slightly more progress
I have a text block! And a cut-out template!
It's been fun figuring out how many folds I want in my accordion, and how many pages I want in the total book. Having finally battened that down (it is possible that "battened" is not the best verb for this, but whatever), I am now experimenting with what kinds of paper work in my sad little printer and what kinds do not. THEN I am experimenting with which papers work in the printer AND are strong enough to stand up in bold little accordion folds. After that I get to start printing and assembling... Which means experimenting with binder board and different glues and my fabric. Secretly I am prepared to hit PaperSource on Sunday if the fabric thing doesn't pan out. Looking forward to getting sticky. Good thing I don't have a job this summer. :)
It's been fun figuring out how many folds I want in my accordion, and how many pages I want in the total book. Having finally battened that down (it is possible that "battened" is not the best verb for this, but whatever), I am now experimenting with what kinds of paper work in my sad little printer and what kinds do not. THEN I am experimenting with which papers work in the printer AND are strong enough to stand up in bold little accordion folds. After that I get to start printing and assembling... Which means experimenting with binder board and different glues and my fabric. Secretly I am prepared to hit PaperSource on Sunday if the fabric thing doesn't pan out. Looking forward to getting sticky. Good thing I don't have a job this summer. :)
Tuesday, July 6, 2010
update!
With my type choices ... chosen ... and researched, I decided to jump in and tackle the project of figuring out how exactly to layout a pocket accordion book in InDesign. I'm terrible at working in stages, and like to make the product as I go - if that makes any sense - so starting to work in ID really got me more excited about the direction of the book. The mock-ups photoed (excuse the i-phone) are scaled for 8.5 x 11 but I'll print the finals on tabloid so each pocket will be 3.75" x 3" - large enough, in other words, to not only have some weight but to also hold the characters that will slip in the pocket.


Here are some shots of my screen after a lot of trouble-shooting. For one thing, figuring out how many columns to create caused me way more trial-and-error than I'd like to admit. I'd committed myself to featuring 6 faces, but it took a sad amount of time to realize that the four-column fold would be the ideal solution - leaving 2 extra "pockets" to be transformed in their emptiness into the front and back covers. (I found this tutorial which, while kind of silly, made me really excited to add book-board covers and stitch the pockets - I'm a sucker for stitching and also think it will work nicely into my concept...) The second shot shows the page 1 and page 2 as well as (off the pasteboard) my aide to visualizing how this thing would fold up.
...But back to my concept. What exactly is that?
Well, loosely defined... The characters I'm featuring are all kind of neat typographic stories (or at least, I hope to make them so). Right now, I'm working in the default ID color palette - this is usually the first thing I change when I open a document because when are these colors ever appropriate? But I love the idea of referencing the print process with these - pure Cyan, pure Magenta, pure Yellow, and a standard mix for red, navy, and green. It's not a modern story, though, and digital printing is... so I threw in an art nouveau pattern on the background to bridge the gap, add some playfulness, and reference the inspiration for the project - mrs. eaves. (the font was created in 1996 based on the classic baskerville, who in real life had taken the real-life mrs. eaves as his mistress after her husband died.)
At any rate, beyond sizing, it took some playing to get the pages to print correctly. They're built double-sided, since i'll fold the text up to create the pockets. This means the text blocks have to be rotated 180 degrees and arranged right to left, rather than left to right.
I think it's finally gaining steam though, and I can't wait to bring these characters to life!
Monday, July 5, 2010
a smidge more progress
SO. Still no pictures, but that will happen shortly.
I am finally finished wrangling my idea (yes, I got my idea approved what now seems like weeks ago, but...). For a long time it seemed pragmatic and high-functioning. I was reasonably happy with it. But it didn't stir me. It brought me zero joy.
This morning I figured out how to solve that. NOW I have joy and anticipation, and I can't wait to get cracking. I've made the text block in InDesign. I think I have determined on what kind of paper I will print this thing. I found a wonderful fabric for the covers that I am pretty sure will work with the Podge. Also, I like it that I get to use the word Podge all the time.
Anyway. Back to work! Pictures soon as I evolve the book. I hope you are all enjoying the long weekend, if you had one, and the weather (although it is just a tad bit too hot).
Anon.
Sunday, July 4, 2010
Postcards finished!
I used the long weekend to finish my books since I'll be away for most of this week/weekend.
One of the first things I faced while beginning the process of gluing was deciding on mod podge vs. glue stick.

The paper that I used for the outside cover was parchment paper and bubbled up when I used mod podge to glue it to the board. The glue stick turned out to be a much better option for this book.

I held the paper + board up to a lamp to line the board up with the cover and back

Again, I found the bone fold to be incredibly helpful!

Making progress....

10 books of Postcards!

A close-up of the cover (a photograph of Our Lady Before Tyn Cathedral that I took while visiting Prague)

A close-up of the back

Sample pages (AKA the little Postcards)

All together :)

I have to say, aside from feeling all sticky from the glue, I had a good time putting this book together. Once I got the most difficult (in my opinion) task of cutting board out of the way, it was just a matter of making sure my the pages were glued on straight. My favorite part of the process was designing the cover and pages in InDesign. It was nice to use that program again.
Have Supplies, Will Craft.
I finally went to PaperSource and got my supplies!


The left flap opens into a picture of a sunset I took and edited a little in photoshop:

There is my book. Now I just have to get down to constructing the other 9! Happy 4th!
 If you have never been to PaperSource in Annaplis, go immediatly. You will LOVE it! Since I had my supplies, I decided to make one of my books in its complete form first to see if my idea would even work and to work out the measurements with real materials and not just sketches. So here is one of my books! It's a little rough, but it worked!
The Cover:
Right after opening:
The left flap opens into a picture of a sunset I took and edited a little in photoshop:
 The left side unfolds four times, revealing more sections of the poem:
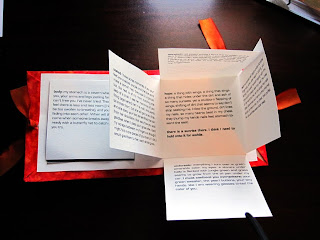
And it all ties together with the great dyed satin ribbon I got at PaperSource:
Subscribe to:
Posts (Atom)
